Thursday, 14 February 2013

Review : Book Your Table App

Name of App : Bookyourtable
Category : Food & Dining

About the app :
Bookyourtable was launched to deliver the convenience of online reservations, food ordering and Discount deals for all guests. Bookyourtable today operates in top 10 cities of India & has plans to expand to other cities in India very soon. It is also a perfect search destination if you are hoping to get some fabulous discounts to explore the culinary world in India.

Bookyourtable,  provides you a simple way to find tables that meet your desired criteria for cuisine, locality & price.  Through Bookyourtable you can view Restaurant details like address, cost for two,offers, restaurant timings etc. You can download coupons and vouchers.

You have this app in book your table website , you can download the app from Windows 8 App Store.

I am writing this review for the windows 8 app store app.

On Installing ;creates a wide tile on the start screen.

Splash Screen : Its is one of the applications where I have seen a metallic splash screen.

Capabilities : a. Internet connectivity and Geo Location.

Design Style : Uses Flat navigational m
Home Page :
Pros : 1. Tiles  are arranged properly , neat and informative.
2. Cannot click on a tile , which has no information.
3. When not signed in I am welcomed as Guest , but if I sign-in , close and open the app again I am not welcomed. :(


Flyouts : Uses a basic flyout .
When I click New User:Registration Form pop-ups .
Let us try to evaluate the registration module:
Pros:
1. Very simple and elegant.
2. Errors are notified in red like :


3. The UI navigations and tabbing that registers a user is good.

Cons:
1. Although this is a clean way to do , but all my errors are not notified to me at a single go , I would have appreciated if it had given me something like :
 2.  after signing-up the app doesn't clear already entered values. :(  That is a negative point from the app developers.
3. I need to login manually even after I have registered successfully and the session hasn't died. :(
I did not like this feature.

4. You get no notification mails even after after registering.

5. Mobile number is the primary key for registration , but for signing-in you need to remember username.

6. There is no forget password / reset password feature available.

7. I cannot sign out of my app without closing the app itself.

Now lets see My Profile:

 Pro :
1.  Simple and Straight Forward .
2. Shows User data and Bookings.

Cons:
1. There is a remove button , which should ideally remove the old bookings from the screen. It should be placed along with the booking info , on the div/ grid column itself , but it placed in the app-bar and most of the time it is of no particular use.


2. The Scroll bar and flip slider button should be invisible when no data is present.

Now , lets go to Featured Restaurants module:
Pros:
1. Select buttons are placed very nicely , neatly and can be accessed with ease.
2. Book Now feature is neat and easy to use. 
3. You can write and post reviews easily.
4. You can mark favorite easily.

Cons:
1. Although Home page shows 12 options , I see only 11 options in my Featured Resturants Page.


2. Featured Restaurants don't change when I change the location , put I show reload the page every time I change the location.

3. Not sure the distance is calculated, with reference to What? If it is calculated with respect to longitude and latitude then also the distances shown here don't match the actuals.


4. For the slots which are past. I am able to click on book now but am shown with wrong error
I am said to select a time slot when there is no where I can select a time slot.
5. The error messages are shown in white instead of read. :(
6. Even when the time has not passed  , I am not allowed to book any slots ( reason no more seats are available.) but I am shown with error message.
7. Session is not persisted between pages. If I plan to go back to previous page from Book now page to change the number of people/date the whole UI is reset back .

8.  Although I can take favorite , I cannot remove it. Marking the favorite doesn't reflect back on my profile immediately.

9. Post review does not validate if you have added any thing in the text box/marked the stars or not.


For all other modules( Dine Out and Buffet) , the above points remain valid .

Let us look on to the Coupons  module  now:
Pros: 
1. Simple and straight forwards , the ways coupons is handled is great.
2. You get all the relevant features in a single go.
Cons:

1. Share Source is not implemented I guess

2. Although I am logged-in and my information is there with the app , still them I am forced to enter the mobile number to send coupon.
Agreed I may want to send the coupon to someone else but we can always give it pre-filled , editable text box.

Final verdict

The app is good usable , fast and efficient.Although there are certain things that needs to be removed .
Many features from the website of BookYourTable is missing. Some of them like testimonials etc are missing.
But it can go a long way in future if properly taken care.

Thursday, 31 January 2013

SQL Analyzer

Are you a developer , who wants to write better SQL code , the code that is optimized for design , performance and security?

Are you a dba who is investing 100 man hours to do SQL code analysis to find one silly error?

We have designed a tool code named 'SQL Analyzer' which will help you in writing SQL codes and doing SQL code analysis.


Discover a new way to do code static, dynamic and in-Line analysis for Microsoft SQL Server.

Welcome to SQL Analyser.

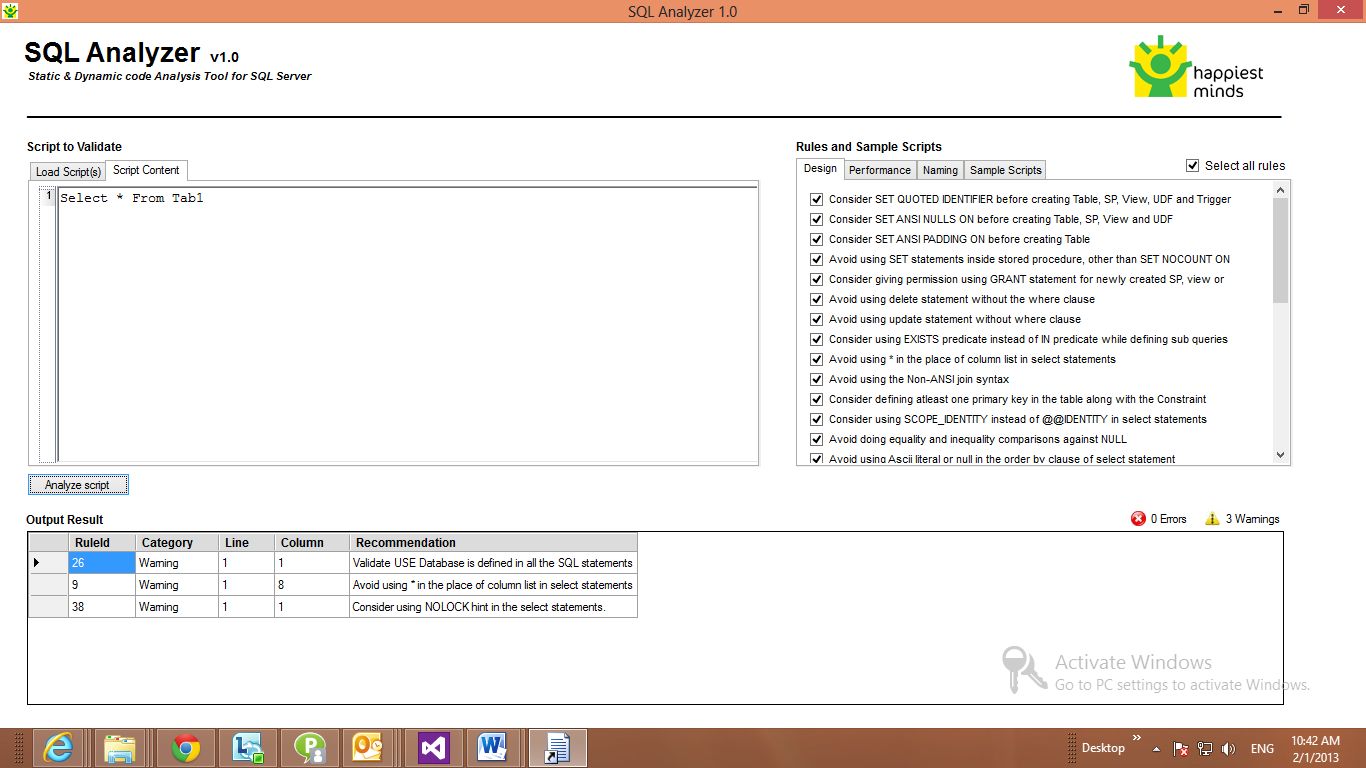
SQL Analyzer is code analysis tool for Microsoft SQL Server which evaluates SQL scripts written in SQL Server against the best practices provided by Microsoft and Happiest Minds practices and provides recommendations for improvement.  SQL Analyzer works as both static and dynamic code analysis tool. SQL Analyzer identifies the defects in early development cycle. It helps you to release the quality of database code to production and saves the cost of fixing the defect late in production cycle.

With a single click, SQL Analyzer evaluates the stored procedure against rules and list down the issues and recommendations. 


In its current version it analyses code for MS SQL Server . It analysis your scripts for Design , Performance and Naming standards. Some of the standards are laid out by Microsoft as best practices for SQL Server. Some are laid by Happiest Minds Experts based on the previous experience and industry best practices.

Simple and Robust. Powerful and Intuitive. SQL Analyser is handsome for an effective SQL review.

SQL Analyser is a very simple and easy to use tool. For a normal user it takes maximum of half an hour to get acquainted and start using the tool. Although the UI is simple and straightforward the architecture is robust. The rule engine ensures you get the latest of SQL updates added to the tool.

 SQL Analyzer is available as a web application , as a desktop version , a add-in to Visual Studio , Add-in to SSMS , Command-line tool , as a service that can be widely used.

You can access the trial version at : http://sqlanalyser.happiestminds.com/  and readily start playing with the tool.

We are looking forward to your feedback.


App Bars in Windows 8

The app bar is analogous to a toolbar in classic Windows interfaces, or the ribbon in more recent offering. It’s a container for buttons that trigger commands.

App Bars are available on demand as they are not in the primary scenario of your application building. App Bars can be drawn when you press Winkey + Z or right click the mouse.

You can place app bars at top of the page or at the bottom of the page. A page can contain both top and bottom app bars as well.

<Page.TopAppBar>

<AppBar>

<StackPanel Orientation="Horizontal" HorizontalAlignment="Left">

<Button Style="{StaticResource AddAppBarButtonStyle}" />

<Button Style="{StaticResource DeleteAppBarButtonStyle}" />

<Button Style="{StaticResource SaveAppBarButtonStyle}" />

</StackPanel>

</AppBar>

</Page.TopAppBar>

The above code puts the app bar on top of the page.

<Page.BottomAppBar>

<AppBar>

<StackPanel Orientation="Horizontal" HorizontalAlignment="Left">

<Button Style="{StaticResource AddAppBarButtonStyle}" />

<Button Style="{StaticResource DeleteAppBarButtonStyle}" />

<Button Style="{StaticResource SaveAppBarButtonStyle}" />

</StackPanel>

</AppBar>

</Page.BottomAppBar>

The above code places the app bar at the bottom of the page.

The content of the page lies between the top and the bottom app bars.

<Page.TopAppBar>

<AppBar>

<StackPanel Orientation="Horizontal" HorizontalAlignment="Left">

<Button Style="{StaticResource AddAppBarButtonStyle}" />

<Button Style="{StaticResource DeleteAppBarButtonStyle}" />

<Button Style="{StaticResource SaveAppBarButtonStyle}" />

</StackPanel>

</AppBar>

</Page.TopAppBar>


<Grid Background="{StaticResource ApplicationPageBackgroundThemeBrush}">


</Grid>

<Page.BottomAppBar>

<AppBar>

<StackPanel Orientation="Horizontal" HorizontalAlignment="Left">

<Button Style="{StaticResource AddAppBarButtonStyle}" />

<Button Style="{StaticResource DeleteAppBarButtonStyle}" />

<Button Style="{StaticResource SaveAppBarButtonStyle}" />

</StackPanel>

</AppBar>

</Page.BottomAppBar>

You can also play with the background/foreground colors of the app bar. By default the background color of app bar is black and the foreground color is white.

By default the border for the app bar is not visible to can add the border brush attribute and show the border as well.

<AppBar Name="topAppBar" Background="Aqua" Foreground="Black" BorderBrush="Red">

I can put my UI controls on to app bar , the UI control can be a simple button , a normal checkbox , a radio button etc.

Many people often debate on Microsoft's decision to introduce App Bars. According to msdn:

The reason the contextual commands that come and go are on the left is ergonomic. We found in studies that most users (even lefties!) operate touch devices with their right hand. If selection-based commands were to appear on the right, then as you raise your right arm to select an item you would cover the new commands that just appeared! Similarly, putting commands that are always present on the right allows you to use your right hand to access them, which is ideal because most users interact with touch devices with the right hand. So putting commands that come and go on the left, and commands that are always there for a given screen on the right, makes it more efficient for users to get to with touch.

My view : App Bars are great create UI element  , they help you when you need.

Wednesday, 30 January 2013

PRISM Vs MEF


  • Prism is basically guidance for designing composite applications - where you have a shell and regions that are dynamically assigned, and integrated. It includes an IoC container (Unity) that it uses for it's injection.
  • MEF is a dependency injection framework - it's main goal is to fill in dependencies at runtime for an application. In this respect, it's filling the same goal as Unity does within Prism .
  • Prism fills a broader scope, in some respects, but is also really limited to GUI applications. MEF is just doing one thing (Dep. Injection), but geared to be more general purpose, for any type of application
  • Prism was developed by the Patterns and Practices team. The goal isn't to necessarily make software, but to provide guidance.MEF, from the blog posts, sounds like it is planned to be integrated into the framework, and be used directly inside of MS projects.
  • If you are building extensible applications, extensible frameworks and application extensions, then MEF is for you.The Composite Client Application Guidance is designed to help you more easily build modular Windows Presentation Foundation (WPF) and Silverlight client applications.
So,

  • MEF is not an IoC container, even though it uses IoC concepts.
  • MEF focuses on application reprehensibility with component discovery and composition.
  • PRISM is “a complete solution” for developing UI applications.
  • MEF is not “a complete solution” for developing UI applications although it can be used for creating applications that can be extended.

Migrating to Windows Azure

 
At times we need to migrate our existing applications to cloud. While migrating our application we also need to migrate the database related to this application.
Following the best practices it is always suggested that you migrate the database before migrating the application.
In this article we will see what are the steps typically followed to migrate an existing database to SQL Azure.
As usual for any activity we need to follow the cycle of


For this simple migration activity also let us follow the same cycle.
So, let us start with step 1
Planning:
In this step we will do two things:
·         Identify tools for migration
·         Identify the migration steps
Tools for Migration:
The most common tool use to migrate a SQL database to SQL Azure is: SQL Azure Migration Wizard.
Using this tool we can:
a.       Analyze
b.      Revise
c.       Migrate Schema
d.      Migrate Data
From any on-premise database to SQL Azure database or SQL database for cloud.
So, now out of the two step of planning,
ü  Identify tools for migration
·         Identify the migration steps
The first step is over.
Now we need to identify the steps to migrate the data.
Following are the 5 steps that should be followed for migrating a database from on-premise to cloud.

Now, that we are done with identify tool to migrate and listed out the steps.
The first phase of planning is done.
ü  Identify tools for migration
ü  Identify the migration steps


Now, let’s look at the second phase analysis phase.
Analysis:
In this phase you basically analyze the requirements, for example:


Size of database is critical because of following reasons:
a.       Currently SQL Azure Database have a size limit for a 50GB so if our database is larger, then we need to partition into multiple databases.
b.      Also, large data takes a long time to transmit and so we may face a delay in the data transmission.
These two factors should be analyzed properly and if needed based on these, the plan may need to be modified.


Let’s now, see how the version of database is a critical factor in the database migration from on-premise to azure environment.
a.       Are you moving from SQL Server 2008 or SQL Server 2008 R2? If yes, the database migration to SQL Azure should not take a long time.
b.      If your existing version of on-premise database is an earlier version of SQL Server, it is recommended you “stage” your migration by moving your database over to SQL Server 2008 R2 first, and then up into the cloud on SQL Azure. 
    So, based on these factors also you need to revisit you plan.    
           
Now that we have seen how the size of database and version of database affect the analysis phase, let us now see how the complexity of database affects the analysis.
Before venturing into this, let us first understand what a simple database is?
A simple database is one which deals mostly with data. It may contain a few SPs, triggers, etc.
A complex database on the other hand depend on database server features like  Windows authentication, SQL Agent jobs, replication, full text search, XML indexing, distributed transactions, and transparent data encryption.
If your database is a complex database, you cannot migrate it to SQL Azure , because some of the features of complex database are not yet supported by SQL Azure.

So, by the end of anlysis phase you have completed the analysis of the database and also, updated the plan for any changes.
Next we will see the Execution phase.