Win : switch between the Start screen and the last-running
Windows 8 app Win + C : displays the Charms: the Settings, Devices, Share and
Search options Win + D : launches the desktop Win + E : launches Explorer Win + F : opens the File Search pane Win + H : opens the Share pane Win + I : opens Settings Win + K : opens the Devices pane Win + L : locks your PC Win + M : minimises the current Explorer or Internet Explorer
window (works in the full-screen IE, too) Win + O : toggles device orientation lock on and off Win + P : switch your display to a second display or projector Win + Q : open the App Search pane Win + R : opens the Run box Win + U : open the Ease of Access Centre Win + V : cycle through toasts (notifications) Win + W : search your system settings (type POWER for links to
all power-related options, say) Win + X : displays a text menu of useful Windows tools and
applets Win + Z : displays the right-click context menu when in a
full-screen app Win + + : launch Magnifier and zoom in Win + - : zoom out Win + , : Aero peek at the desktop Win + Enter : launch Narrator Win + PgUp : move the current screen to the left-hand monitor Win + PgDn : move the current screen to the right-hand monitor Win + PrtSc : capture the current screen and save it to your
Pictures folder Win + Tab : switch between running apps
I am not a UI expert. But for developing UI on Windows 8 Apps I need to understand the complete UI as Microsoft's tag line "Content Over Chrome" . I will try to discuss regarding the UI guidelines that Microsoft has laid for a Windows store app.
There are not many articles on Windows 8 app store yet. So my complete knowledge is from the sample apps that I install on my box , the apps that I create and msdn.
Earlier I was having constant fights with Datta ,' Why UI to our team , we are code developers and not UI experts'. Thanks to Datta for his patience , now I know why UI is such an important part of any Windows store app.
The basic reason why we should concentrate on UI before getting into code are:
Content over Chrome : the basic idea behind Windows 8 Store apps is content over chrome.
Create Once User Anywhere : You write the code for a Windows 8 app only once and the app is ready for deployment in any type of devices whether it is PC , mobile , laptop, tabs etc. The resolution , the structure of your app should not change based on the devices but rather the app should have consistent and elegant.
App should be easy to navigate using gestures , interactions , mouse as well as keyboard.
For any app you need to first think on 'HOW SHOULD MY UI LAYOUT BE?' When you are deciding the layout for a particular app the things which you should take into account are:
Typography (from the Greek words τύπος (typos) = form and γραφή (graphe) = writing) is the art and technique of arranging type in order to make language visible.
Let us first try to see
'HOW SHOULD I PLAN NAVIGATION FOR MY APP?'
Your Windows app can follow either
Hierarchical Navigation
Flat Navigation
When should I go for What?
If you have a application with very few pages , and the user needs to go back and forth between the pages , then your app is best candidate for implementing Flat Navigation.
The best example I think is an calendar app or a drop box kind of app , mail app , a video app.
You should go for flat navigation when :
a. you can separate content into various pages.
b. all your pages are at the same level.
c. you need to go back and forth between contents.
When you have a web site where you can segregate the pages based on the content and the details of the content presented then you should go with Hierarchical Navigation. Classic example for a hierarchical navigation is a LMS application.
An example of flat navigation:
An example of hierarchical navigation:
Hierarchical Navigation
Hierarchical Navigation there are three layers:
a. Hub Page
b. Section Page
c. Details Page
Hub Page is the root page , it is the place where the user get info about the app , all the dashboard kind of data , what is new etc.
Every section in hub page is linked to a section page.
In section page the user get a little detailed view of what the page is all about. Again section view doesn't give you a detailed information. Every piece in a section page should link to a detail page.
The detail page is the page where you get the detailed info of what you want.
So, basically all the hierarchical navigation kind of apps have three layered information flow.
Hub page:
Section Page:
Details Page
Flat Navigation:
Flat Navigation is basically browsing from one page to other. So , all the screens look almost the same just the content changes based on ,onto which page you want to navigate to:
There are two terms that we use when creating a flat navigation system:
a. Top app bar
b. Switching
Top app bar is nothing but a thumbnail kind of view , basically this is used to switch between pages.
You must have seen a top app bar in many of the content management system.
In Windows 8 , the page states/view states are not persisted when you use a flat navigation system , because basically all the pages are independent of each other. Switching between pages is directly done.
Now you know what kind of navigation layout you want for the app.
In the next article we will see on layout and commanding.
Ans : A tile is an app's representation on the Start screen.
Q2. What is a tile used for?
Ans : A tile is basically used to represent necessary information to user , when the app itself is not running.
Q3 : Where can I place tiles?
Ans : You can either place a tile in Windows 8 start screen or you can place the same in the lock screen.
Q4 : How can I launch an app from a tile?
Ans : a. Tap b. Click
Q5 : How can I represent a tile?
Ans : A tile can be a wide tile or a square tile.
Tile can be a text only tile , image only tile or a tile with text + image.
Tiles can be single framed or two stacked framed also called as peek template.
A tile can be a live tile or a static tile
Best Practices:
a. Dos : Tiles should be simple and informative.
Don'ts :Do not use colors on tiles unnecessarily.
b. Dos : Use live tiles , when you think the user needs to be updated with new data.
Don't : Don't overuse live tiles if they are not really necessary.
c. Dos : Select between a square tile and a wide tile with proper judgement.
Don't : Don't put a wide tile , just because you want more space on the desktop.
User can always readjust your tile size.
d. Dos : Give appropriate text to your tile. The text should be contextual.
Don't : Don't add user interaction texts on tile like 'click' ,'press' ,'tap' etc
e. Dos : Use Live tiles to show application notifications.
Don't : Don't use live tiles to show advertisements.
Deciding between a square tile and wide tile:
By default a windows app applies square logo. In case you want to provide a wide logo with your app , you can specify the wide logo image in the app manifest. In case a wide logo image is not defined in the manifest the tile cannot be widened but in case a wide logo has been set , user can always resize it to square logo.
You should use a wide logo ,
a. when you need to display a large content of data.
b. when you have a live tile which gets refreshed frequently.
We say in my last blog : what is a splash screen and best practices to create a splash screen.
In this article we will see
a. What is an extended splash screen.
b. Why do we need an extended splash screen.
c. How do we create an extended splash screen.
So , let us start from the beginning. What is an extended splash screen?
An extended splash screen is nothing but a simple xaml page which is shown to you before you see your landing page.
If it is nothing else than a xaml page , then why do we call it an extended splash screen?
You call it an extended splash screen and not the landing page because some of your background events are still happening here , you write all your extra logic which is required before starting your app here, in the extended splash screen.
This screen is called an extended splash screen , because this screen utilises the same class as the splash screen. The class is called "SplashScreen."
So, now that we know what this extended splash screen? why to use this? and why it is called extended splash screen?
Let us get into the code now.(Its difficult for developers to speak anything other than code....:( )
Okay...
So, let us begin.
Step 1: Open Visual Studio
Step 2: Create a Windows Store app.
Step 3: Let us name it ExtendedSplash_Sample
Step 4: In app.xaml.cs Change the OnLaunched method
{ //First we want to check to see if the application was already running. if (args.PreviousExecutionState != ApplicationExecutionState.Running)
{ //If it wasn't, then we want to check to see if it was terminated the last time it was run, //which we will pass on to our Splash page. bool loadState = (args.PreviousExecutionState == ApplicationExecutionState.Terminated); //Create a new Splash page object passing the SplashScreen object to the constructor. Splash splashPage = newSplash(args.SplashScreen, loadState); //Set our current app's content = the new Splash page. Window.Current.Content = splashPage;
} Window.Current.Activate();
In the above code , Following lines are of importance:
bool loadState = (args.PreviousExecutionState == ApplicationExecutionState.Terminated); //Create a new Splash page object passing the SplashScreen object to the constructor. Splash splashPage = newSplash(args.SplashScreen, loadState); //Set our current app's content = the new Splash page. Window.Current.Content = splashPage;
These are the lines which checks if the app is running or not. If it is not running, it creates an instance of the class Splash , which is responsible for rendering the splash screen. and sets the current content of the window to the instance of Splash.
Step 5: In the Splash.xaml add following lines of code: <Canvas Background="#FF8000"> <Image x:Name="SplashScreenImage" Source="Assets/SplashScreen_1.png" Width="620" Height="300" Visibility="Collapsed"/> <Image x:Name="ProgressRingImage" Source="Assets/progressRing.png" Width="620" Height="100" Visibility="Collapsed"/> </Canvas>
Step 6 : You nee to add following code to
a. Do the required tasks , which should be done while the splash is being loaded.
b. To remove the splash screen when the task is completed.
Now, in the Splash.xaml.cs we need the logic to show the extended splash screen.
So, we overload the constructor , so that it takes an instance of the Boolean : loadstate and an instance of SplashScreen.
This is the constructor which we are calling from the app.xaml Splash splashPage = newSplash(args.SplashScreen, loadState);
So, we change the constructor to state
public Splash(SplashScreen splashscreen, bool loadState)
publicSplashScreen splashScreen; publicRect splashImage; Step 9 : In the constructor we are adding
one delegate : splashScreen.Dismissed += newTypedEventHandler<SplashScreen, Object>(splashScreen_Dismissed);
Declare this delegate as follows: void splashScreen_Dismissed(SplashScreen sender, object args)
{
}
Step 10 : The other method we had declared at contructor is PositionProgressRing() , this is the other image we are putting in the extended splash screen. This method does following: a. It sets the position of the splash screen. b. The progress ring/any other image that we need to show when the background process is happening.
One thing that we should note here is the parent for a splash screen or an extended splash screen is not a Grid but a Canvas.
Step 11 :OnNavigatingFrom is the other event which you need to add in the splash.xaml.cs As the name suggests this is responsible for carrying out the tasks which the extended splash screen should do when the user is navigating out of it. Basically , what it does is it dismisses the extended SplashScreen. protectedoverridevoid OnNavigatingFrom(NavigatingCancelEventArgs e)
{ base.OnNavigatingFrom(e);
splashScreen.Dismissed -= splashScreen_Dismissed;
}
}
And you are ready!!!
Step 12 : When you execute the app , the app is readu for you to show the extended splash screen as you need
Link to You tube :
If you have any queries or want to create a windows 8 app store app in c#/xaml , write to me @ architar.dash@gmail.com
Wednesday, 12 December 2012
Copy-Cats
What a nice dress, I say.
What a nice dress, you say.
That perfect top! I shouted.
That perfect top! You shouted.
Great minds think alike?
Or is it a simple fight?
Copycat, copy cat
Go home and chase that rat.
Who is copying whom?? Grand-pa copying sunny dear or was it Asu posing in Grand-pa's style.
I am not sure!!!
But when I tried to pose with them , little Asu chased me out shouting ....'Maaa....Jaaa' (Mother go out) , and When Papa tried to come out of screen so that we can take a single snap of Asu in his trade mark 'Vivekananda Style' he started crying and pulled papa saying...'Aaaja...Come' ( Come grandpa)
What is splash Screen:
Splash screen is the screen that immediately pops-up when user invokes the Windows 8 app.
Its utility:
During the time when splash screen is shown user initializes the app resources. Makes all the required resources to the app.
Lifetime:
Once the app is ready windows dismisses the splash screen.
Best Practices:
a. Every Windows Store app must have a splash screen, which consists of a splash screen image and a background color.
b. You can also use the SplashScreen class provided by Windows 8 library to create an animated splash screen. (The kind we used to create with flash files in a Windows application.)
c. Your splash screen is your application's usp , you should make it as interesting as possible. It may be a very simple screen , but it should be inviting. If your splash screen is not interesting , user may not be interested to see your app.
d. When creating the splash screen , take care of the form factor of the device on which this app is going to sit on.
e. Put a background color and an image together to form a splash screen , if your image is within a background color the screen re-adjusts itself to fit to the device.
f. Splash screen gives brand value both to you(organisation) as well as the app.
g. Use transparent image as splash screen. This ehnaces the visual effects.
h. For scaling within devices provide three versions of splash screens.
1x - 620 * 300 ; 1.4x - 868 * 420; 1.8x - 1116 * 540
Having three versions helps to have same user experience throughout.
i. Listen to Splash screen dismissed event to give a clean app user experience to the end-user.
Do not use Splash screens for:
a. Advertisement
b. Display rolling images.
c. About / Help page
The best rule :
Test your app in all devices it an be used with. All possible form factors and resolutions.
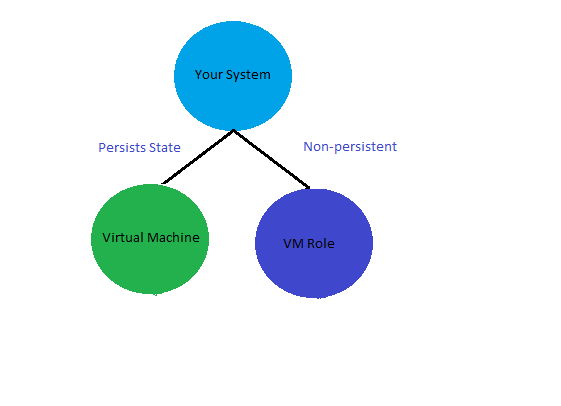
When talking to folks working on Azure , I have found many of the developers(junior as well as senior developers ) getting confused between Windows Azure VM role and Windows Azure Virtual Machine.
So, I thought of writing a small article to tell that these two features are not same , although they sound same.
1. VM Role ; is PaaS (Platform as a Service)
VM ; is IaaS (Infrastructure as a Service)
Platform as a service (PaaS) is a category of cloud computing services that provide a computing platform and a solution stack as a service.it is a service model of cloud computing. In this model, the consumer creates the software using tools and/or libraries from the provider. The consumer also controls software deployment and configuration settings. The provider provides the networks, servers, storage and other services.
Infrastructure as a Service(IaaS) is the model where the user provides physical virtual machines and other resources. The VMs run on hypervisor , Xen, kvm etc.
2. VM Role ; is stateless
VM ; is stateful
When I say stateless , I mean if the Azure fabric decides to start your VM role in some other host than the local file system will be lost. But in case of a Virtual Machine they are almost like your on-premise VMs , its just that they are running on Microsoft Data Center.
For this reason at time Azure Virtual Machines are also called as Persistent VM Roles.
3. VM Role : Maintains OS automatically
VM : You are responsible for maintain your VM
When you are using a VM Role no need for you to think about updating patches and software updates , the system take care of those automatically for you. But when you use a VM Role , you are responsible for managing and maintaining your machine.
4. If you have an existing Linux machine and want to deploy it as a VM Role you cannot, but you can deploy it as a VM , that is allowed.
Conclusion:
Use a VM Role if you want to have a greater control over your provisioned application, use a VM if you want to take your on-premise OS(Microsoft/non-Microsoft OS) to Azure.